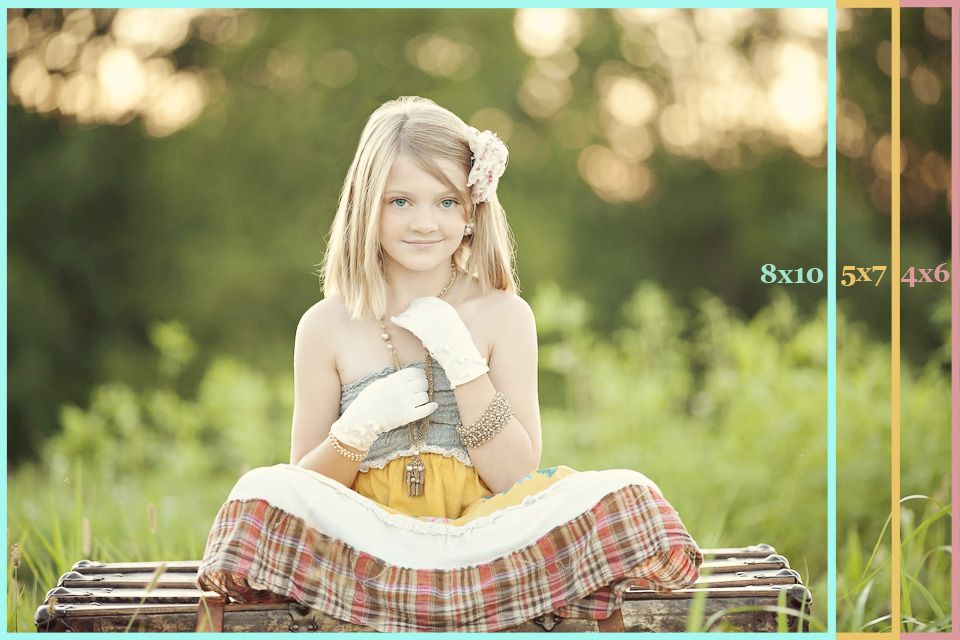


So you bought the perfect frame to match your darling new dining room, and you have that beautifully composed image you want to show off in the frame… and then you go to print it and realize that you cut off a piece of the picture, whether it be the background, a part of the body, or even a whole body. Why would you lose part of the image? It’s because of aspect ratio. Aspect Ratio is simply a measurement of a photograph’s width to height. The aspect ratio for 35mm cameras, film or digital DSLR’s, is 3:2. This means that the long side is 1.5 times as long as the short side.
So every time you want a well cropped 8×10, it will always be fatter and more “square like” than a 4×6-which is more horizontal. You will always lose 2″ of the image when cropping for an 8×10 from a standard image. I typically give my clients their final images as 12″x18″ at 300dpi, which is a very large and crisp resolution. 300 dpi is typically the standard resolution that printing companies want to receive in order for the images to come out clean and clear with good quality, if not 240dpi. Most online communities such as Facebook or Twitter will automatically crop your images down for you, leaving you with images at 72dpi which is a lower resolution, as you can see the uploaded images on Facebook are typically not the best quality.

So just remember when you are going to crop an image, that depending on the aspect ratio, you could be losing a part of the image. A lot of clients that receive their digital files from their photographers are trying to print images and canvas on their own and typically come back frustrated that their print is not what they wanted, just because they didn’t understand that in the check out, they needed to “crop” their image to their liking. If you have photoshop or understand photoshop or any image program, you can hit “C” on your keyboard to make the crop tool open and active, and then set the width and height to your desire.

So the big question from photographers is, “How do I crop the image to fit what I need, without losing the important parts of my image?” And the simple answer is, to just simply shoot wider. Get more of the background into your image so that you can always crop later. It’s hard for me sometimes, because I love the tight shots and intimate moments that your eyes and expressions can portray up close, but it’s always easier to zoom out a bit, and crop later, than it is to shoot tight and lose a sale because the size the client wants on a canvas or print won’t fit after cropping. It’s just something you have to train yourself to do, or just understand when you’re shooting tight that it could potentially be a purchased print.
CROPPING FOR A CANVAS | Ordering & proofing
Depending on the company that you use and their guidelines, and then the width of the canvas you are wanting to use, will all determine how you crop a canvas to not lose any of your image. Most canvas’s will stretch your image around the edge to create that fine art, gallery type of feel. Some canvas companies now are allowing you to choose a solid color or a textured border instead of losing parts of your image. In my case, I like the professional “timeless” look that having your image wrap around will bring. I sell canvases at 1.5″ thick. So with that said, my company makes me crop appropriately before sending in.

If I were to want a 16×24 canvas printed, I would need to add 1.5″ all around my image: both left and right sides, as well as top and bottom. This way, when it wraps 1.5″ on all four sides, you will have what you are wanting to be “seen” in the middle. So for a 16″x24″ canvas, I would need to crop it the same way I did for a print (click “C” on your keyboard) and then size it as 19″x27″ (adding 3″ total to your canvas size).
In order to check what will “wrap” before sending to the printer, to make sure you’re not losing any important part of the image, I want to be able to see exactly what will wrap and what will be shown on the front. In order to do this, I want to place GUIDE LINES in the spot to show from that point on, that is the part that will wrap. In order to place a guide line in Photoshop, I go to “View” on the menu bar, and then click “New guide” toward the bottom. This will open a box that will allow you to place the guides perfectly in the places you want.

Because my image will wrap at 1.5″ .. I want to select “vertical” and then place a guide at 1.5″ and then do the same thing and place a vertical guide line at 25.5″.. and then the same for horizontal.

This is what it would look like with all four “guide lines” on the image.

CLIENTS APPROVAL
Finally.. JUST for the sake of my clients, to make it easy to understand what exactly will be wrapped… in order for them to APPROVE their canvas for me to send it to the printer, I take the “Rectangle tool” on the tool bar, (below)
 …then select a color, set the opacity to 50% on my “layers” (so that they can slightly see through to see the image) and then drag and drop it over the areas that will be wrapped so they know “exactly” what will wrap. Then I take a solid white at 100% opacity and drag boxes over the corners because those will be completely stapled to the back and won’t be seen anywhere.
This is how they would see it as a final proof. **MAKE SURE YOU DO NOT SEND IN THIS PROOF YOU SENT TO YOUR CLIENTS, TO THE PRINTING COMPANY.** You will want to remove the (light pink and white) boxes and just send the image in itself. This way the image will be what is wrapped and not your colored guidelines for your client. Tada!

I hope this helped. Please “LIKE” me on my FB page if you found this helpful. And Congratulations on making your first canvas or print.


Thank you for sharing this! Simple and informative.
I see now why photographers often dont offer the cd, just prints through their company, because clients dont know how to crop properly to keep the composition/artistic look of the photo, thanks for this
Wow. What a great way to explain it & walk thru all the steps. Thank you so much!